Privacy Policy for http://design-interiorgreat.blogspot.com/

If you require any more information or have any questions about our privacy policy, please feel free to contact us by email at dengkolpeyok@gmail.com.

At http://design-interiorgreat.blogspot.com/, the privacy of our visitors is of extreme importance to us. This privacy policy document outlines the types of personal information is received and collected by http://design-interiorgreat.blogspot.com/ and how it is used.

Log Files
Like many other Web sites, http://design-interiorgreat.blogspot.com/ makes use of log files. The information inside the log files includes internet protocol ( IP ) addresses, type of browser, Internet Service Provider ( ISP ), date/time stamp, referring/exit pages, and number of clicks to analyze trends, administer the site, track user�s movement around the site, and gather demographic information. IP addresses, and other such information are not linked to any information that is personally identifiable.

Cookies and Web Beacons
http://design-interiorgreat.blogspot.com/ does use cookies to store information about visitors preferences, record user-specific information on which pages the user access or visit, customize Web page content based on visitors browser type or other information that the visitor sends via their browser.

DoubleClick DART Cookie

.:: Google, as a third party vendor, uses cookies to serve ads on http://design-interiorgreat.blogspot.com/.
.:: Google's use of the DART cookie enables it to serve ads to your users based on their visit to http://design-interiorgreat.blogspot.com/ and other sites on the Internet.
.:: Users may opt out of the use of the DART cookie by visiting the Google ad and content network privacy policy at the following URL - http://www.google.com/privacy_ads.html

Some of our advertising partners may use cookies and web beacons on our site. Our advertising partners include .......
Google Adsense
Commission Junction
Widget Bucks
Adbrite
Clickbank
Azoogle
Chitika
Linkshare
Amazon
Kontera

These third-party ad servers or ad networks use technology to the advertisements and links that appear on http://design-interiorgreat.blogspot.com/ send directly to your browsers. They automatically receive your IP address when this occurs. Other technologies ( such as cookies, JavaScript, or Web Beacons ) may also be used by the third-party ad networks to measure the effectiveness of their advertisements and / or to personalize the advertising content that you see.

http://design-interiorgreat.blogspot.com/ has no access to or control over these cookies that are used by third-party advertisers.

You should consult the respective privacy policies of these third-party ad servers for more detailed information on their practices as well as for instructions about how to opt-out of certain practices. http://design-interiorgreat.blogspot.com/'s privacy policy does not apply to, and we cannot control the activities of, such other advertisers or web sites.

If you wish to disable cookies, you may do so through your individual browser options. More detailed information about cookie management with specific web browsers can be found at the browsers' respective websites.

Filling In the Gaps

Over the last two weeks, Dave and I have been sprucing up our pine floors, which run throughout the majority of our house. While pine's heavy grain has a beautiful and rustic quality, it's a relatively soft wood, and as a result can be a major pain to deal with. Indentations from dogs, cats and high heels have all made their marks on our floor, but I'd really just consider that some "character".

The real problem has been in between the wood. Since these aren't engineered planks, there's no interlocking system keeping them next to each other; the floor boards are just nailed straight into the subfloor. And so, as our house has settled (which all houses in Houston inevitably do), the boards have spread apart. The prior owner had filled many of these gaps with wood filler, which was stained to match the floors' finish. And that was fine until Olivia came on the scene. Last spring, Olivia managed -- I'm not quite sure how -- to actually eat most of the filler in the wider gaps. Suddenly, the floors started to look like this:

Not horrible, but definitely noticeable, especially when you repeat this over, oh, 800 square feet of exposed floor. Fearing that the only way to properly fix the floors was a full-on refinishing (which would require (a) removing all our furniture and (b) more money than we wanted to put into fixing the problem), we put off doing anything about it for months. Recently, however, as we contemplate a move (more on that later), we decided it was time to face the music. Luckily for us, the music was pretty sweet: the floors could be fixed without refinishing; some wood filler was all they needed. Encouraged, we decided to tackle the project ourselves. First stop was a trip to Loew's for the necessary supplies.

In order to fill the spaces between your floor boards, you'll need some wood filler. We stumbled on Elmer's Wood Filler, which comes in two convenient sizes depending on the size of your job. This stuff works great. Like their school glue, Elmer's wood filler is water soluble, which makes for super-easy clean up (no worrying about getting the filler all over your floor -- you can just clean up at the end with a mop, water and a little elbow grease). To apply the filler, simply use a spackle knife and smooth some of the filler over the cracks, sweeping perpendicular to the crack/hole. Keeping smoothing the area over with your spackle knife until the filler is flat with the surrounding area, applying more filler as necessary. Since the filler will reduce a little bit as it dries, you may need to come back with a second application for deeper crevices. Once we finished applying the filler (and cleaning up), our floors looked like this:

We let the filler dry overnight before we went back over it with a Mimwax wood finish stain marker (we used "Early American" finish), which works just like any other paint pen. Staining the filler was actually far more tedious than applying it in the first place (though clean-up was -- as usual -- my least favorite part of the whole process) and I managed to get it all over me. Because of the huge area we had to fix, the entire process took us several weeknights and a good bit of a Saturday, but smaller jobs could easily be tackled in an afternoon. But the finished product turned out pretty well I think:

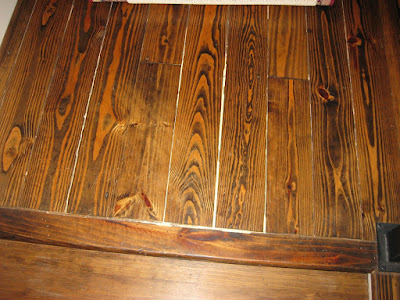
In the above photo, you can see how beat up our floors really are in some places, but I think the filled crack blends in pretty well, don't you? As a warning about the Mimwax stain markers: they don't go very far; in fact, we ended up running through a half dozen of them during the course of the job, so I'd suggest buying several if you're doing anything more than a minor touch up or two. Additionally, I thought the stain was rather transparent, so we ended up having do go over most areas several times to get the right depth of color.

Now that we've finished the project and our cleaning service thoroughly cleaned the floors, I'm really happy with the result. It took a good bit of work, but by doing it ourselves, we saved a lot of money on labor and in the end spent less than $100 on the necessary supplies. My only regret is that I didn't do it sooner!

No comments:

Post a Comment

Related Posts Plugin for WordPress, Blogger...

Blog Archive